|
YouCanDraw.com's
Much more coming See your pictures Back to the Learn more |
Suzy Voye of Tennessee's own art page
Getting down to
the nitty gritty: tightening up Suzy's 4/15/02 Let me just start
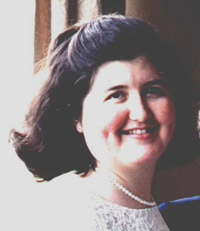
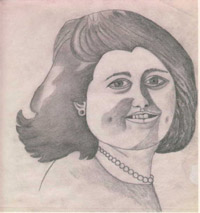
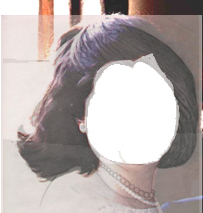
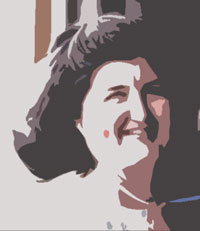
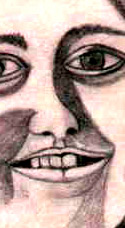
out by honoring Suzy for her courage and her willingness Let's look at the original photo and drawing:
Very nice Suzy! (I
have to tell you, I've seen Suzy make some amazing progress over the last
18 months. Like lots of people she says she'll draw heavy duty for a few
weeks and then take 6 months off. Can you progress like this? Sure, but
it's often harder to jump back in. Why? Because your expectations are
still back at the level of the last drawing, and if it was a really good
one, well the resistance will be that much higher. And know this, that
resistance is just a cardboard dragon - because within a few short minutes
of restarting, that pain and resistance will evaporate. And so will the
dragon. Honest.) So let's dive on in The first tact I'll
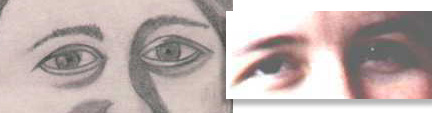
take here is reconnoitering the overall shape and proportion. Applying the Horizontal guides Let's waste no time and get right to the pictures. The original photo Suzy's drawing from on the left, her drawing on the right:
On both you can see
the horizontal guides applied (complete with a vanishing 1) the top
of the head/hair line Right on Suzy! These
are pretty dang accurate. Now let me tell you how The only inaccuracy
I can find (and it's small) is the alignment of the left eye
Now this'll be review,
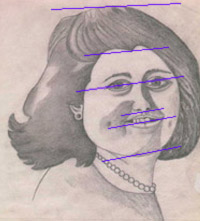
but what the heck, let's run through it. The reason Review: On Mr. Average, the proportion goes something like this: if the whole head is 1 unit tall, then the middle of the eye line will cut across the horizontal center of the face (one half of the distance down from the top of the head or 1/2 the distance up from the bottom of the chin line - depending on which way you approach the picture); the bottom of the nose line will be 2/5ths the distance down between the middle of the eye line and the bottom of the chin line. (Of course, the easy way to figure that is just go 1/2 the distance down between the middle of the eye line and the bottom of the chin line and then push it up a little - with practice you'll get good at visualizing it. And don't forget to review the Flash Interactive Lesson 1: the Horizontal Guides to really nail this down.) The middle of the mouth line is one third the way down the lower half of the lower half of the face (which would put it a third the way down from where the bottom of the nose line dropped before we pushed it up a little); the top of the chin line drops on the second third of the way down the lower half of the lower half of the face. I know, sounds so dang complicated, but you'll get it if you draw it out a few times). Back to Suzy's drawing... (Now, we're concerned here with a realistic rendering but if we were going to caricature this photo, the first proportion that jumps out at me is the middle of the eye line to the top of the head proportion and even moreso the proportion the hair takes up of that distance. There's some luxurious hair there! Note how it's more than one half the Mr. Average distance. So, you could give Suzy's daughter a huge pile of hair :-)
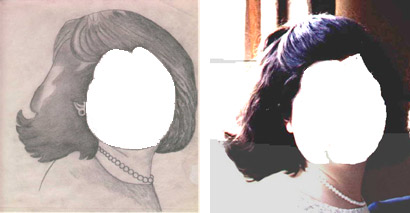
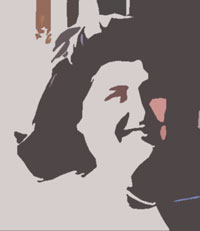
Look between the following sets of pictures. I've brushed out the outline of what I perceive to be the outline of the faces (photos can be hard to work from). I think they're very close Suzy - your drawing and the photo. And I think there's a small amount of straying along the border of the forehead and the hair both above the center of the forehead and at the temples. Look closely:
And here's the originals:
Lastly, here's an overlay of both pictures. The brighter white is the outline of the drawing. It's just a hair smaller than the photo version of Sara which helps bring out what I think are those mentioned areas of mild inaccuracy:
What is just as apparent are areas where I might reach back into my memory and draw what "I think" a hairline ought to look like, or what an eye ought to look like. In Suzy's picture, it seems like in the area of the hairline Suzy may have been drawing what she "thought" a hair line ought to look like rather than recording the information in front of her. This often happens when an artist rushes through a drawing, or feels rushed, or even a little overwhelmed with information - and there's lots of things going on there: wisps of hair obscuring the border between forehead and and hair, the shadows in the photo, the size of the photo. Lots going on. And we all do this. The trick is being "aware of your awareness" and catching yourself when you're rushing or referencing preconceived pictures and categories of how things "ought" to look; referencing categories filed in our brains filled with abstracted objects (e.g. my "table" file where tables have four legs and a square top.) And speaking of hairlines, look at the excellent job Suzy did of capturing the shape of the hair. (Look at the pictures above.)
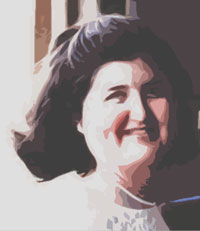
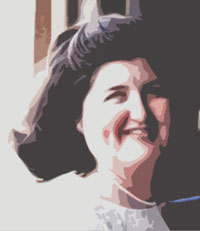
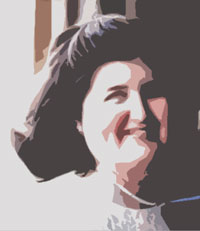
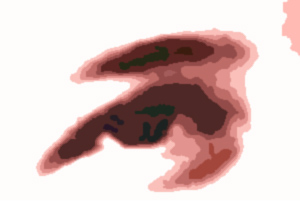
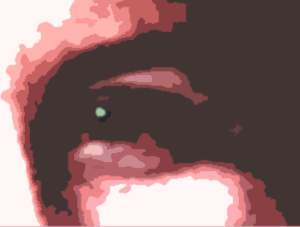
And speaking of shadow shapes... We're whipping through this I know (and I hope it's helpful), but let's get on to an area of where Suzy has done stupendous work: the shadow shapes (we're going to leave the "feature by feature" exploration for the next communiqué - features like the eyebrows, the nose, the eyes, and the mouth). Shadow areas shapes like everything else on a face And when you look at the Suzy's original drawing, you become aware of all the different shadow shapes - and shades of color and gray, blue, skin tone, reflected light - it gets complicated! But you know what? You have a built in weapon to combat this. What is it? How do you glean the important detail from the distracting? (You can always add more detail, but getting the overall shape close at the beginning makes all those details that much more impressive.) So what's the trick? So how do you reduce all that detail? Squint! Yes squinting is the most amazing little artist's secret when it comes to reducing the complicated to the manageable. And this is especially applicable when it comes to shadow shapes. So let's take Suzy's drawing right through the whole range of squinting levels - taking away detail as we go. And this'll be close to but not exactly similar to squinting but you'll get the idea. And here's the idea: as you close your eyes (squint your eyes) little by little, more and more detail will begin to disappear with each step. It'll look a little like the following five pictures:
Interesting - the various versions we came up with. To see an area of real tonal change look at the neck (we did that with "cutouts" in the "artistic" section of PhotoShop filters in case you were wondering). None of the versions above capture the shadow shapes entirely, nor with perfect accuracy but you do get a feel for the process, right? Again, it's this: the more you squint, the more detail you remove and the better you can capture complicated shapes. What you can also get here is a feel for areas of common shadows - common to all almost everyone. And those areas* are these - if I had to name them - going from top to bottom: 1) shadows
of the hairline and curve of the forehead *(This is with light coming mainly from above.)
Identifying the general areas of shadow
Now squint at the original on the right just below and see if you can't identify all those shadow areas. Now compare to the originals:
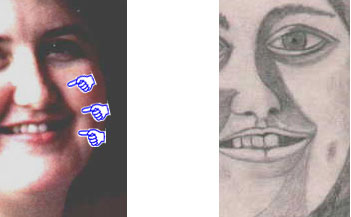
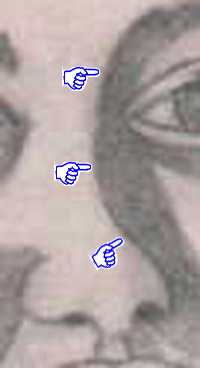
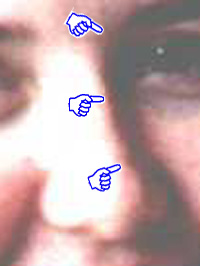
Pulling out the microscope Using the two photos above for reference, Suzy, I want you to go right through the eight or so main shadow areas - little piece by little piece - and see if you can't see those small areas that I'm getting pickie-yoonie about :-). The main shadows that I see that are just a teensy bit off (and so slightly change the personality of the picture), are these two areas: 1) the shadows directly under the eyes and 2) the long shadow that runs from the eye brow on the right (Sara's left eye) down along side the nose, around the corner of the mouth down to the chin. I'll bet seeing the picture shrunk the way it is here makes it easier to spot - which is tantamount to getting up from your drawing chair and taking a few steps back from your drawing. This gives you a whole new perspective. Often hard to get yourself to do in the middle of a drawing, but it pays dividends. (The pointer fingers point at the largest contour changes.) (Note: it takes effort to capture even small contour changes. In fact sometimes, especially in the beginning, you have "exaggerate" just to get a realistic effect. So really get radical even while drawing realistic pictures. You can always erase.) Comparing this one shadow in both pictures:
Squint while you observe and look back and forth between pictures. At the same time move your hand as if you were holding an imaginary pencil and drawing on an imaginary piece of paper. Feel your hand moving in rapid exaggerated jerks as it moves from section to section of the shadow contour.
We started at the top looking at the overall shape of the head and applying the horizontal guides, we applied the technique of squinting for identifying and simplifying the major shapes on a face and then we went as far as naming areas of shadows that are common in all faces. Lastly we started getting a little more detail-oriented in our exploration of Suzy's drawing. Well that's all for this week. We'll finish this up in a couple weeks looking more into depth at the particular features. Suzy I just want to thank you again for your willingness to let us make comments about your drawings. It helps us all grow and learn. It's an awesome effort on your part, and your progress and enthusiasm are immensely gratifying. Thank you. Part
II: taking
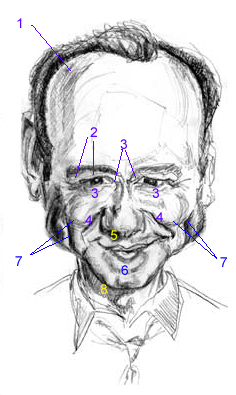
a closer look at the individual features It's been a little longer than a couple weeks but not to worry, I haven't forgotten. Let's pick up where we left off here: taking a look at the most obvious individual features: eyebrows, eyes, nose and mouth. And I say most "obvious features" because all the little sub-features within a face contribute to the overall look of a face too. But you don't have to capture all, or any of them to draw a good likeness. (Reread the Difranco In Depth section of Lesson 15 for more on that.) OK. Let's jump in. The Eyebrows. Here's a cutout of just the brows and eyes:
Do a general scanning of each of the following parts: 1) the left
eye brow's overall shape;
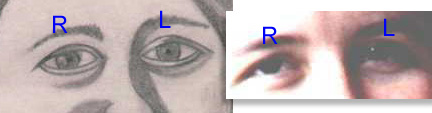
[Just to clear up
any confusion, I've put an "L" for left and and "R"
for right over each eyebrow. We always use "anatomic" left and
right in these lessons. "Anatomic" means thinking of left and
right as if you were the person being observed. Put yourself into this
picture and you'll see the "L" is over your left eye, and the
"R" over your right. Get it now? :-)]
Getting
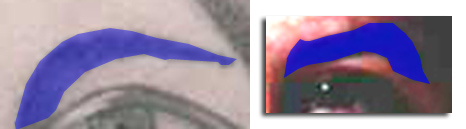
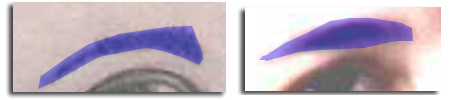
left and right straight 1) In the next picture you can see the left eye brow (right as we look at the picture and photo). I've highlighted the shape I perceive in blue. They're different, wouldn't you say? Not a whole bunch, but they're different. The photo view seems to have more of an angulation at the side closest to the temple. In the drawn version, the brows seem to me to be drawn a little more from memory rather than from the information from the photo. Could that be possible Suzy? ;-) The L's compared:
Comparing
Suzy's drawn version of the left eye brow
The R's compared
2) When you compare the drawn version of the right eyebrow to the photo version, again you can see the slight variation in shape. The photo version is a little more cigar shaped I think. Compare the close-ups to the photos above and see if this isn't true. We tend to apply
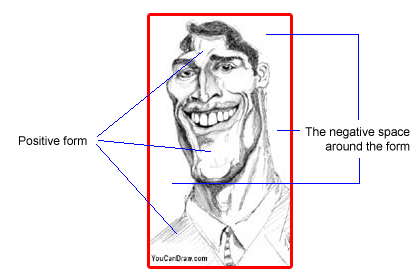
names to things we can put our hands on Now the interesting thing that happens when when one shape is drawn a particular way, it will invariably influence the shape immediately next to it. Why's that? Because in a picture, we're dealing with shared edges all the time. Lets equate that to what we've we just seen. The eye brows proper butt up against the next shape, "the space between the eyebrows and the eyes". When we label features like "eyebrows", "eyes", "nose", "lips", etc, our logical minds categorize them. That's fine for communicating ideas, but when it comes to drawing, it gets us into trouble. How? We tend to devalue anything we don't or can't apply a name to. And it's not even intentional - it just gets ignored. When you describe a person to someone verbally, you'll say things like "he/she has bushy eyebrows, big nose" etc. But how often do you say things like "she has a convex space between her brows and eyelids? Not unless you've learned to observe as an artist does. Back to Positive forms and negative space We view the features we're familiar with (eyes, ears, nose, etc.) as "positive forms". Everything else then, can be considered as negative space - though this label was reserved for nonphysical objects in a picture - like the space around a person, or the sky over the subject's head. It has a very real shape, (the spaces) though it would be tough to buy on E-bay. In this next picture we're considering the whole face as the positive form and the background as negative space:
(See
Lesson 6- for more on Positive and negative space)
Positive space Instead, these other spaces on the face can be more correctly considered positive spaces. They're as real as the more commonly named features, but we just don't ever talk about them. Sorry, I'm off on a tangent here, but if we're going to talk about them, we have to be able to agree on what we're talking about...;-) Does that make sense? But if you do consider these less talked about areas on the face as real, then it makes sense that a change in the shape of an eyebrow will considerably influence the shape of the space between the eyebrows and the eyes lids (all that yack was about getting to that). Let's see what I mean:
3 and 4) See how those little changes in the shape of the eye brows influence the overall shape of the next adjacent shape - the space between the eye brows an eye lids? The pieces fit together like parts of a puzzle. So little changes or simplifications made in drawing the eye brows are having a subtle domino effect on the space between the eye brows and the eye lids. Which brings us to the next topic of interest. The eyes:
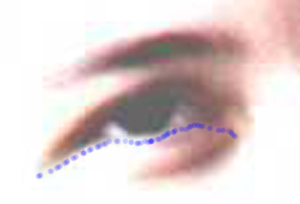
Observing the arch of the upper lid, on the right eye (anatomic right), I think you've captured the curve accurately. Now Suzy, picture me as your friendly task master when I ask you this: where do you see those double lines around the eyelids? :-) I'm ribbing you. Yes, you're correct that eyelids have thickness to them - that's absolutely correct - but can you really see them in your photo? Yes there's definitely a suggestion of them. Maybe they're more visible in the original photo, but I think you've slipped a little out of r-mode (you know, artist's mode, observational mode), and you've referenced categorized eyes. Could this be possible :-)? ("Lighten up Jeff!" Ok, Ok :-) What you did capture very well was where the eyes - actually the irises, the colored part of the eye - contact the upper and lower lids, especially in the anatomic right eye. Onward. We've talked about the shadows under the eyes above. It's the lower edge I'm going to make you look at closer now:
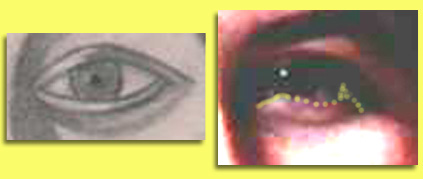
Here (just above), I've airbrushed (in PhotoShop) the lower border/edge of the lower lid. I know if you look close you'll see the difference and say "how the heck did I miss that the first time through?" Slowing down, taking a step back - both are such keys when drawing difficult areas. The other option, is rather than try to draw the eye itself, is draw the shape around the eyes. Drawing those areas you, by default, draw the shape of the eye without getting caught in the trap of referencing the category "Eyes" in your brain. The information is always "out there" under our noses. The task is reporting it accurately, especially in realistic portraits. Seeing it in the first place, then exploiting it is the key to caricaturing. Compare the lower lids of both the left eyes in both the photo and the drawing now (I've drawn a light yellow outline along the main curve of the lower lid that actually contacts the eye):
Easy when you see it like this, huh? If you're working from photos, it's really important to have large photos so you can see what the heck you're drawing :-) A drawing aid like a magnifying glass is a real help if the photo you have is on the small side. Still more... Like I said above, you did a wonderful job capturing the shadow that runs from the left eye brow (anatomic left), down the side of the nose, along the left side of her mouth (anatomic again), right down to her chin. Now, here's an assignment. I want you to draw this eye, as it is. Look at it long enough so that it stops looking like your own daughter's beautiful eye and you begin seeing it as a shape or group of shapes.
If that's too hard right now, squint like we talked about above and see if you can't discard a little of that fine detail and color/tone information and collapse it into something more manageable like this (looks like some kind of bird silhouette to me right now):
After you've done two or three runs through of the right eye I want you to do the same with the left eye Suzy. Then, if you're still game - and after you've reread this whole page - I'd love it if you redrew the whole picture. (And if you want to send in you're drawings of the smaller individual parts too, I'll post them all right here.) Yes, I'm working you because you have it in you to do some really wonderful art work and I'm going to push you :-)
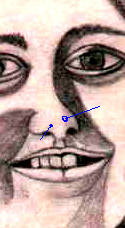
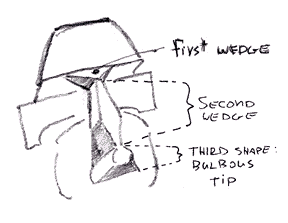
The exact same kinds of observations can be said for the main lines of the nose. But I have to add this right now, of all the possible shapes out there in the universe that could have been drawn, your's are very, very close to what you're trying to draw Suzy. And like I've said above I'm very proud to be a part of your progress. Progressing down to the nose Look at the next two pictures, yes I'm getting so dang nit-picky it isn't funny. Still, check out the arch of the nose and at about the same three places the pointer fingers are demonstrating. Be aware of how high above the medial canthus (the inner corner of the eye), the arch in the photo is compared to the drawing - very close. See if you can't discover the small differences (remember, we're building our observational and sighting skills as much as anything else in these reviews).
View the same areas the pointer fingers demonstrate between these two pictures. (Scroll up and down). Note - or better imagine - where the three wedges of the nose are. It's one thing to know certain shapes are there - that helps you viscerally visualize the anatomy you're drawing - which is not permission to draw what's not really there, but only a technique to help see what may be there that doesn't show up in a picture. (I'm thinking more of the eyelid example above when I say that.) Squint your eyes and focus in on the nostrils and see if the anatomic left nostril doesn't collapse into the shadow shape under the whole lower left nose (you can still see the deep shadow of the left nostril - and you caught that well Suzy).
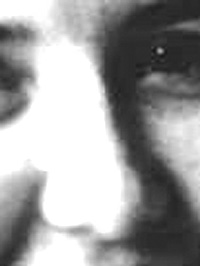
Here's an area that doesn't show up well in these enlarged pictures that you did beautifully Suzy: there's some light shadowing at the tip of the nose and on to the left nostril (left anatomic nostril). It's very accurate and subtle. It's more easily seen when the picture is shrunk and the contrast is turned up in PhotoShop:
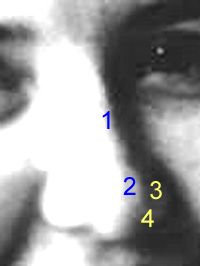
Check out the blue markers above. They point out the pattern of shadows on the tip of the nose. The tip of the nose can have so many planes that shadowing can get very complicated. In these next two pictures I've numbered some areas of shadow. Some shadows are true shadows, some are a combination of shadow and reflected light. In the picture on the left below, you can see the bottom most wedge shape of the nose forming by just the arrangement of shadow and shadow shapes. Look close, can you see it?
Compare these pictures above to this next picture of the nose with special attention given to the third wedge shape of the nose - the bulbous tip. Lean back in your chair and squint, shifting your attention between the pictures above an below:
Last but not least: the mouth No need to say much here - you've done a wonderful job Suzy. You've very successfully captured the shape of the mouth, the teeth, the alignment of teeth, the middle groove of the lower lip, lower outline of the upper lip and the nasal philturm (the little groove between the nose and the upper lip). And most importantly you've captured your daughter's personality. When you redraw this picture, here's two things I want you to pay special attention to Suzy: 1) in the case of drawing lines, ask if it might not be more faithful to the picture if you outlined a shadow shape then shaded it in. Said a little differently, might it be easier to hatch in a shaded shape in place of some of the heard lines? I want you to experiment with that. (For example, look at the nasal philtrum, the borders of the lips, and the most outside corners of the mouth when you ask this question - see if the hard lines can't be softened up by maybe smudging in a shadowy area, How to do that? Rub a Kleenex over some penciled-up paper and do a little smear on your drawing with the now "dirty" Kleenex. Or dig directly into your drawing with your finger tip. It's messier, but it's fast and I always like the result. Or pullout the old tortillon...or whatever that lead-less rolled up paper pencil thing is :-) And 2) look very closely at the lips - look at the variety of shadow shapes, shadows, lines, grooves, and highlights contained within it. I personally find lips the hardest feature of the face to capture accurately and even harder to shade / highlight correctly. So don't feel bad. Squinting collapses both the complexity of the shapes and the variety of colors into something more manageable, (like you see in the top of the three following pictures) and slow, deliberate exploration and study will pay huge dividends.
Well that wraps up the lesson for today. Hope everybody in YCD-land learned something. If anyone wants to send Suzy a 'thank you' for her willingness to be displayed like this, or complement her drawing / give further comments on her drawings, send them to me and I'll happily forward them to her. (back to top) Take care all, thanks again Suzy, and keep on drawing! Warmly, Jeff. Kasbohm & Company's
6920 Southdale Road e-mail: comments@youcandraw.com
|